Paper Dollies Tutorial

Today I have a tutorial to share with you. Paper dollies are pretty but they are usually white or pink. That’s just so common so I thought it would be nice to make some to make whatever paper I’m using for my layout.

Here are the basic steps:

1. Trim your paper into a square.

2. Fold the square into a triangle.

3. Fold it again into a smaller triangle

4. If you are able to fold further, fold your triangle into a smaller triangle.

 photo Paper Dollie Tutorial B_zps76eb44hy.jpg5. Draw a curve at the top of the triangle.

6. Trim off the curve and you have a basic dollie.

7. Continue cutting tiny holes into your triangle if you more details on your dollie.

8. Open it up and admire your hardwork.

 photo Paper Dollie Tutorial A_zpsu5wtknmm.jpg


Here is a layout I made with my own handmade paper dollies:
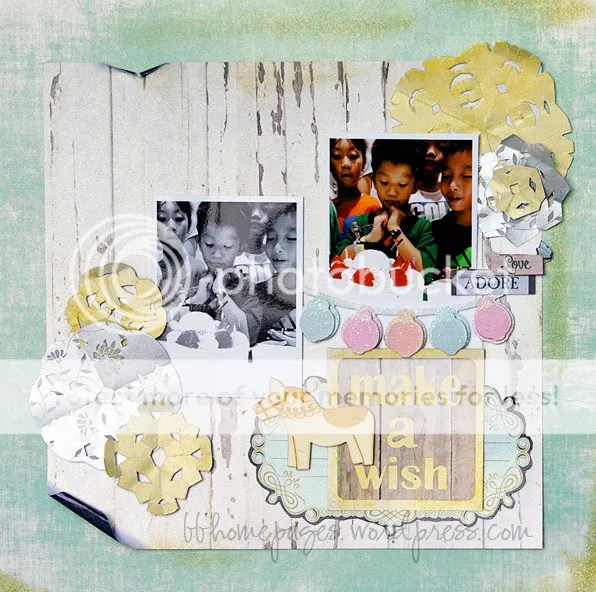
 photo MakeWish_SB_Tutorial_zpswbp0mfun.jpg

Some closeups:
 photo MakeWish3_SB_Tutorial_zps3y213lq1.jpg
 photo MakeWish4_SB_Tutorial_zpst4egdhgh.jpg

Do have a try. Drop me a link to your work if you made some dollies too.

Cheers,

-JuneGoh

Creating a Shaker Element Tutorial

Just crawling out of hibernation. I’ve been a little busy with stuff and the time just flew by. I thought I had this post scheduled but it didn’t post. So here is my tutorial for simple shaker cards.  I made some shaker cards last month and thought it would be fun to share the steps with everyone.

First, lets get all the materials ready.

 photo Tutorial_ShakerCard4_zpsimonowln.jpgYou will need:

a. Pattern paper for the top frame of your shaker

b. Chipboard

c. Base image for the shaker

d. Clear acetate

e. Glitter or Sequins

Steps:

1. PIck an image from your patterned paper for the base image. For this project I choose this lovely image from RRBF’s My Romance line.

2. Cut the chipboard, acetate and top frame to the same size as your base image.

3. Leaving a 0.5″ to 0.75″ border, cut out the middle sections of your chipboard and top frame just like the picture above.

4. Make a sandwich with the base image at the bottom, followed by the chipboard frame, acetate and top frame. Check that all layers align correctly before we start gluing the shaker together. I use a wet glue for this project as it allowed me to move the pieces around a little before everything bonded together.

Here is a video showing how the layers should be assembled. Do excuse the quality of the video. It’s my very first attempt at a video.

Here is the card all assembled:

 photo JuneGoh_Tutorial_ShakerCard_zpsex4fpo8y.jpg

Don’t you like the shake shake shake fun.

Cheers,


-JuneGoh

Mini Album Tutorial

Here’s a tutorial that I shared on Ruby Rock-it’s blog last month. It’s a simple mini album that you can make in a jiffy.

First you need to get all your supplies ready:

– 6 pieces of 6X6″ double sided patterned papers – these are the insides of your album
– 2 pieces of 6X6″ the same patterned paper for your album covers
– 1 strip of 6X3″ paper for your album spine
– 1 strip of 6X12″ cardstock scored at 1″ intervals

 photo Mini_Album_Tutorial_zps8d5c858a.jpg

Fold the white cardstock at the scored lines until you have an accordion strip. Glue on the inside pages onto each valley of the accordion strip. photo Mini_Album2_Tutorial_zps32c8d849.jpg

Glue all the sides of the accordion strips so you end up with a stiff album spine.
 photo Mini_Album3_Tutorial_zps11371dcf.jpg

Next, glue the strip of paper you have reserved for the album spine.

 photo Mini_Album4_Tutorial_zps98e1d90c.jpg

Glue on the two pieces of patterned paper for the album cover on each side of the spine and you now have a mini album.

 photo Mini_Album5_Tutorial_zps6d7abb59.jpg

Ta-da !!! It’s now ready to be decorated.

 photo Mini_Album6_Tutorial_zpsd7b3666f.jpg

Here is what I did with my mini album. It’s now ready as a gift for Father’s Day.
 photo Mini_Album7_Tutorial_zpsf3ddb484.jpg

It’s a simple way to get an album ready in no time


Cheers,

-JuneGoh

The Sweetest Thing and a tutorial

Hi there, thank you for dropping by my blog. Today I have a washi tape inspired layout for share. Why would washi tape be inspiring ? I just cannot get enough of the lovely prints and colors available. Needless to say my collection has grown with each new season release.

 photo Sweetest5_SB_1Jul13_zpse56f3aac.jpg

The funny thing is that my layout today was inspired not by colorful washi tapes but these black and white tapes seen above.
 photo Sweetest_SB_1Jul13_zps930bdd8f.jpgWell, the tutorial is not exactly a tutorial but a really short description on how you can easily use the tapes to transform your plain-ish patterned paper into something eye popping. All I did was cut random sized triangles from the two rolls of washi tapes and then layered them on my denim blue paper.

 photo Sweetest4_SB_1Jul13_zpsbfdc62cc.jpg

The tapes are easy to peel off and reposition. Once I had the triangles positioned the way I likeed them, I added a few sprinkles of white and black paint to compliment the tapes and my background was ready.
 photo Sweetest2_SB_1Jul13_zpsbb38e6af.jpg

 photo Sweetest3_SB_1Jul13_zps028067c0.jpg

A few pretty embellishments and the layout was completed. If you are wondering why the title looks familiar it’s actually the cut from the title strip from a used piece of MME paper from The Sweetest Thing collection. Yes, some scraps are too pretty to be thrown away.

Do have a great week and drop by again soon,

-JuneGoh

Lesson Time and a tutorial

I went with happy misting and layers with this layout and added a little hand sewing to the mix. I have to confess that the sun rays didn’t turn out the way I expected but the sewing part was a real experience. I was reluctant to actually sew but was glad that I did. It was fun.

 photo LessonTime_SB_21May13_zps267e43fb.jpg

Since the thread color didn’t contrast well with the background paper, I decided to twine more thread around some cardstock to pump up the yellow hue on the page and make the sun pop a little more.

 photo LessonTime3_SB_21May13_zps29003c38.jpg

I was playing around with my punch when I realised that I could make tiny leaves. I just doodled some lines on the punched out leaves and used them on the layout. Prefect.
 photo LessonTime2_SB_21May13_zps9cce97fa.jpg

Since I was so happy with those leaves, I thought I would just do a quick tutorial.

 photo LessonTime4_SB_21May13_zpsf960a882.jpg

Step 1: Grab a piece of pattern paper and punch out one circle. Use any of your circle or oval shaped punches.

 photo LessonTime5_SB_21May13_zpsd8e714ed.jpg

Step 2: Insert the pieced you punched out in Step 1 back into the punch. Wiggle your paper until you get it similar to the photo above.
 photo LessonTime6_SB_21May13_zps69544579.jpg

Step 3: Punched out the shape and you end up with two pieces like what is shown here. Just fold your leaf shape into half and draw on some lines. Then have fun with your leave embellishments in your projects.Do drop me a comment if you like the tutorial.

Catch you again,

-JuneGoh

Tutorial – Crepe paper flowers

As there having been requests for a more details on the crepe paper that I did for the Making Memories post, I posting a  detailed tutorial on the crepe paper flower.


What happens when I cannot not find a suitable embellishment in my stash to highlight the page – I decide to make my own flower in the shade that matched my layout.

 
All you need are a few basic items:
– crepe paper (in any color you require)
– circle punch (or you can just trace the base of an small circle container)
– card stock
– glue (double sided tape or tape glue)

Photobucket

1. Punch or cut out a circle of cardstock of your desired side. I used both a 1″ and 1.5″ circle for the flowers in my layout. Apply glue all over one side of the circle.

Photobucket


2. Give the end of your crepe paper a little twist and stick onto the middle of the circle.

Photobucket

3. Keep twisting the crepe paper and stick the crepe paper onto the cardstock in a circular pattern.

4. Keep going until you reach the edge of the circle.

5. Tape the lose end of the crepe paper to the back of the circle and cut of the excess.
Now you have the perfect colored crepe paper flower for your layout.


Photobucket

I hope the steps are much clearer now. If you have any questions, do drop me a message. Cheers.